Last update | April 7th 2025

contact@ossdental.com

image


CASE EXAMPLES RELATED TO OUR APPROACH TO CLASSICAL & DIGITAl DENTISTRY - QUALITY WITH CONSISTENCY


These images are accompanied by technical support which maybe useful to student dentists and the inexperienced dentist and dental technicians wishing to improve there skills.


image


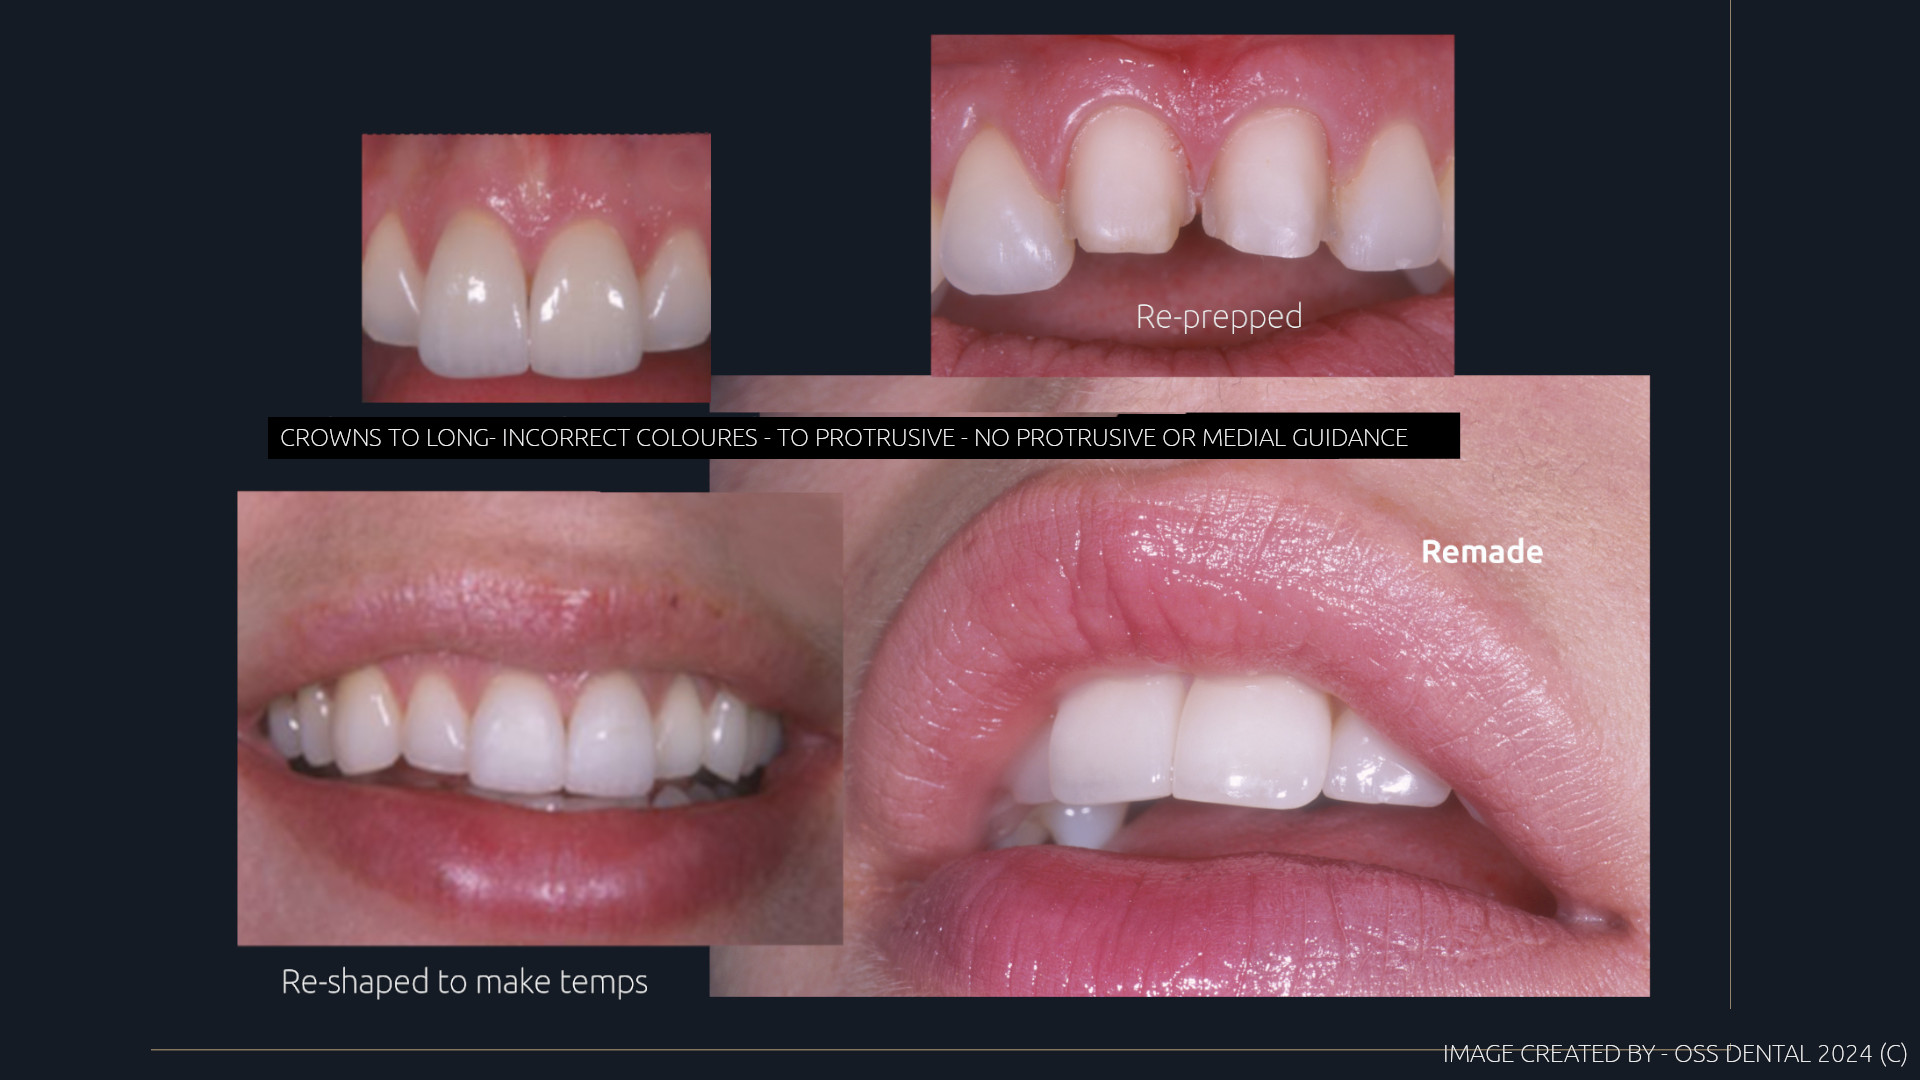
Case No.001; A RECONSTRUCTION - HOW WE MADE IT


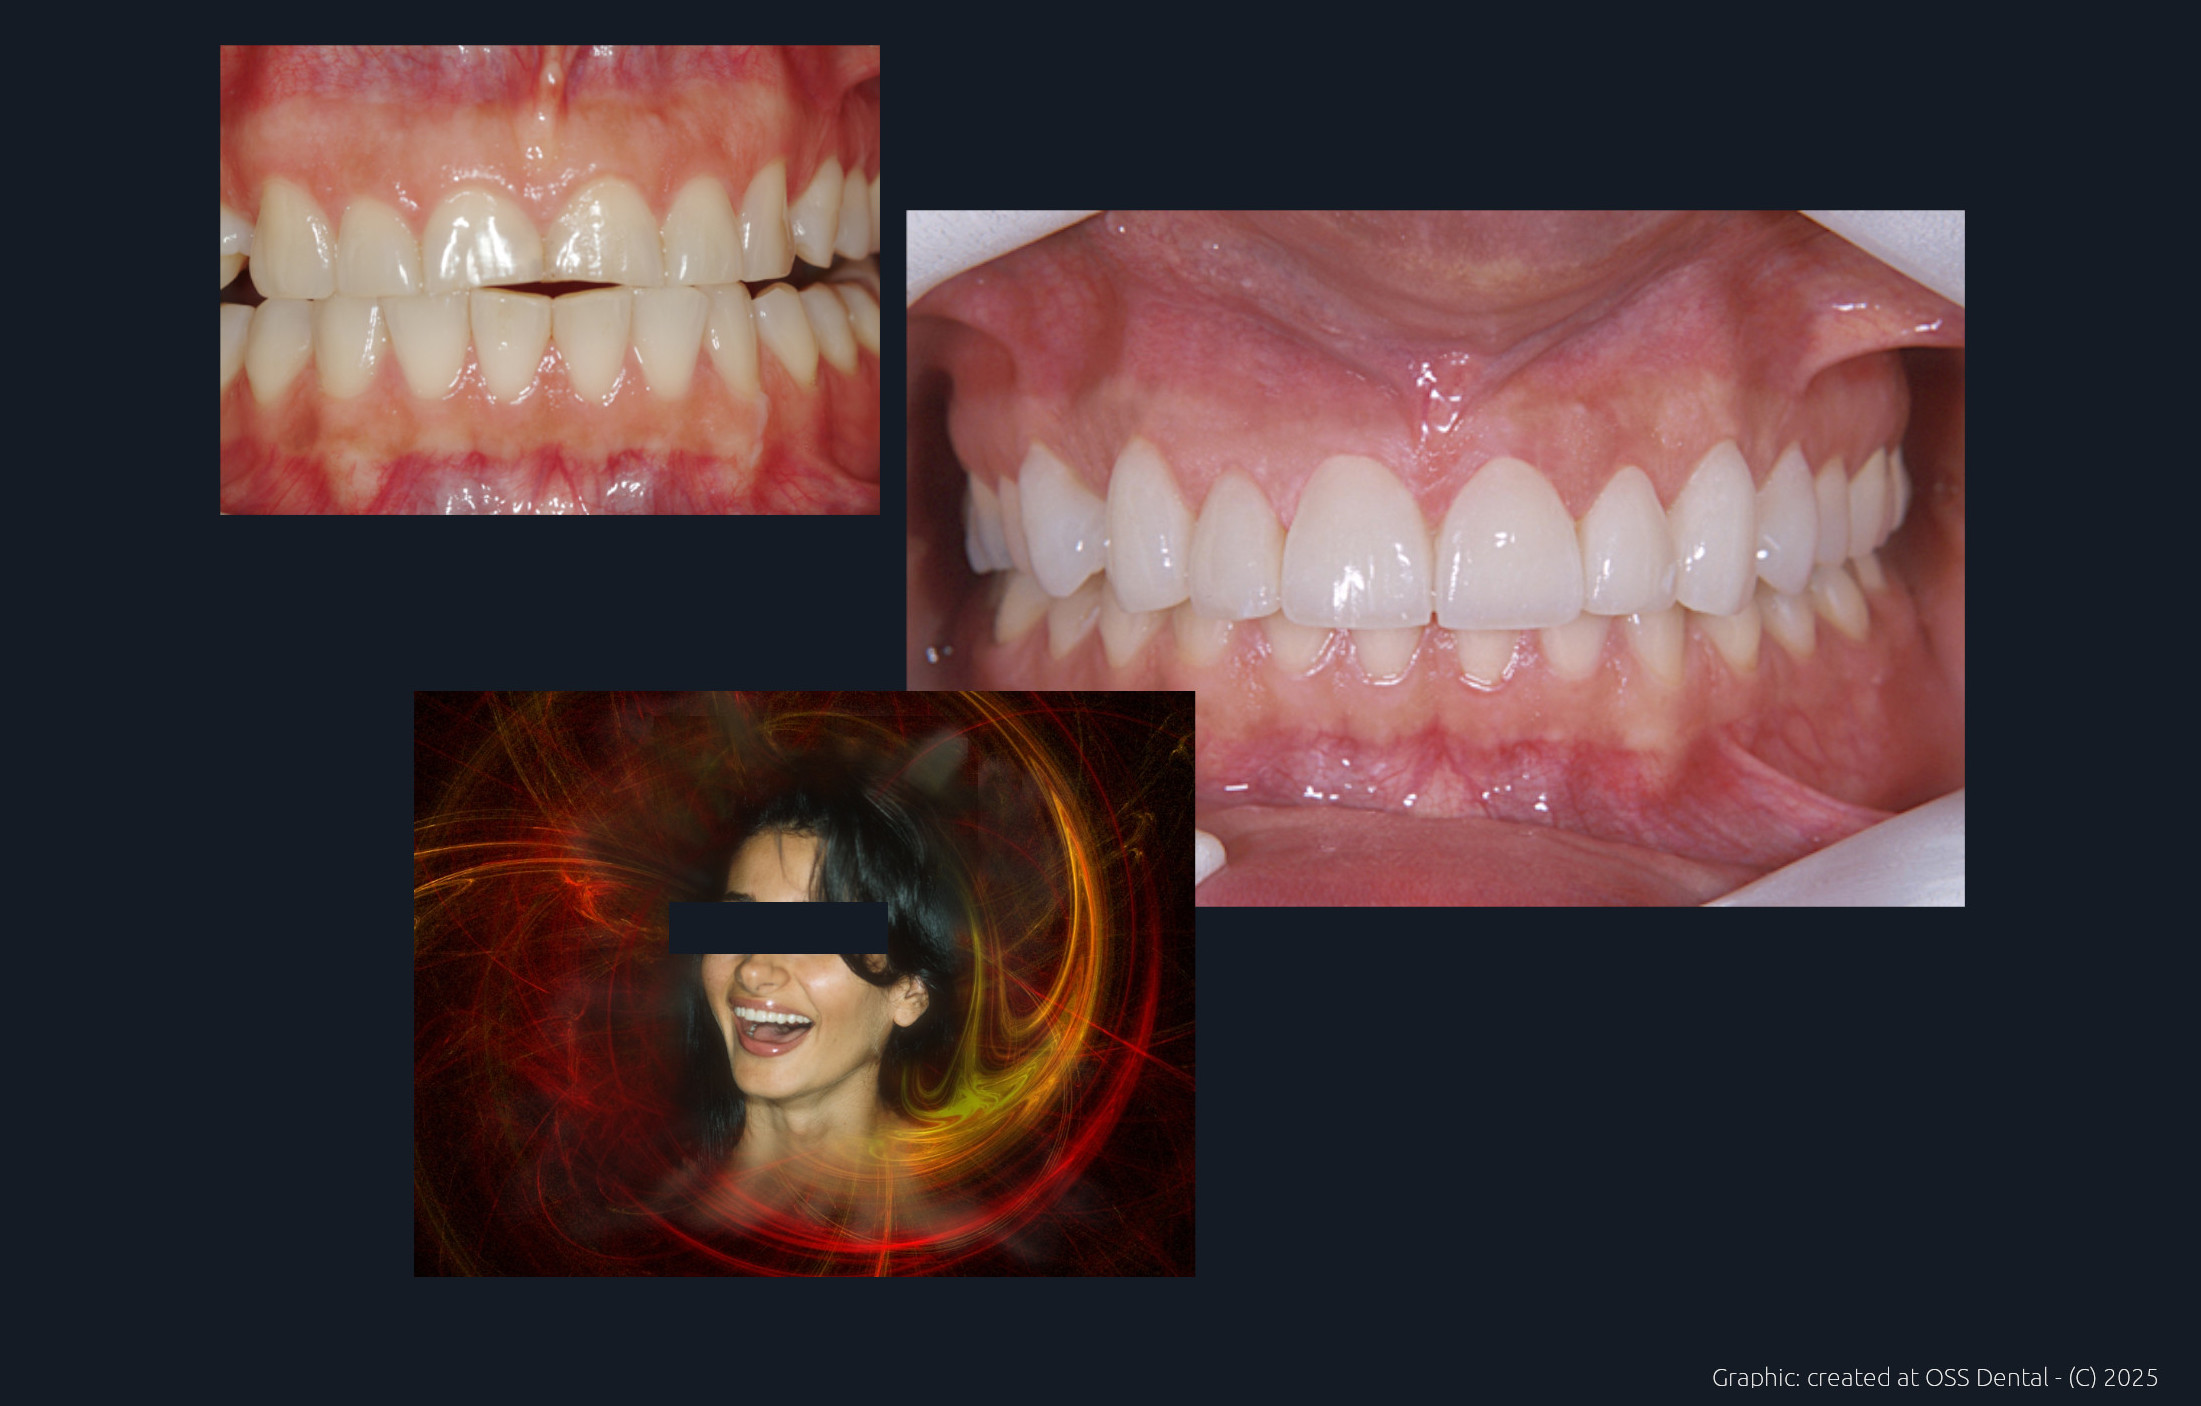
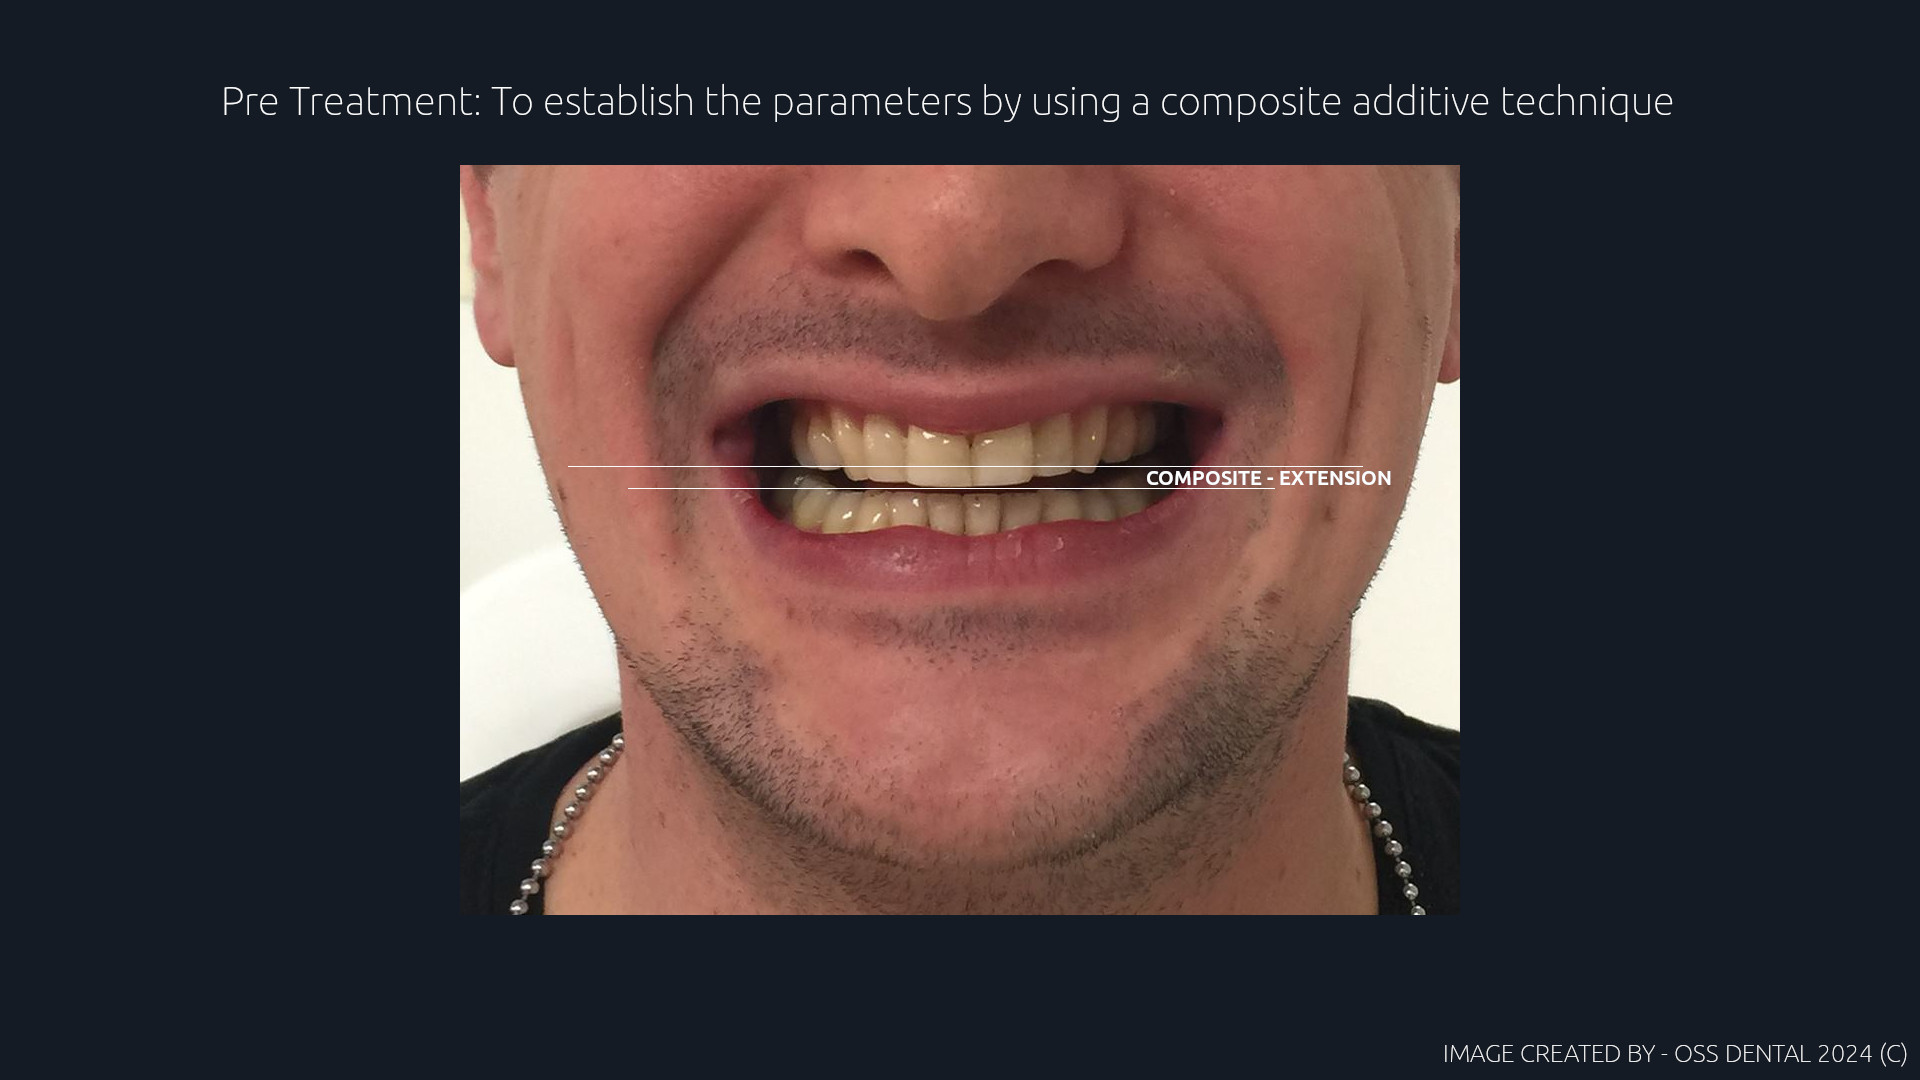
This young ladies smile said it all. This case did not require any complex color matching but it needed a geometric reconstruction. The original dentition was dysfunctional the mandible was displaced and the dentition had a high degree of attrition and had an open posterior occlusion which was driven also from a fulcrum point. Its a typical scenario when the mandible has no place to retreat to. The solution was to deprogram the muscles and reposition the mandible back into Cr.

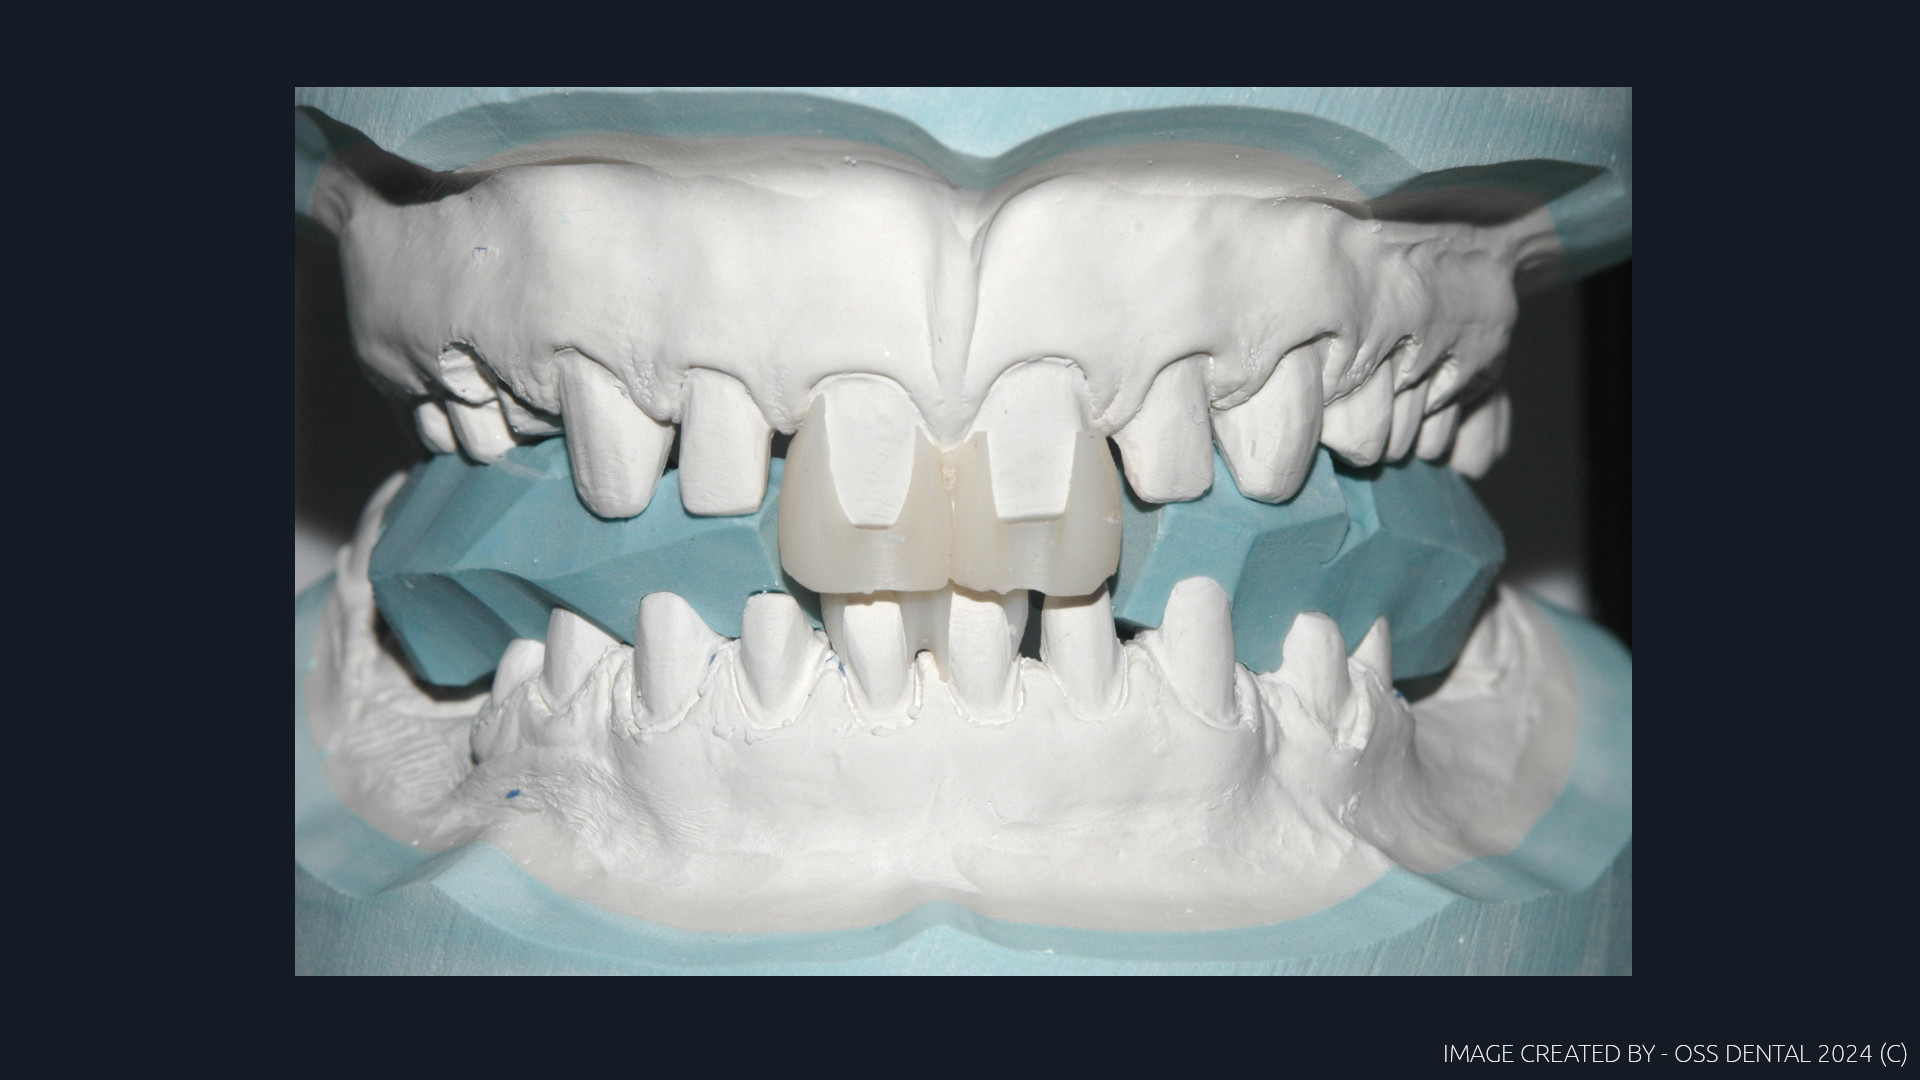
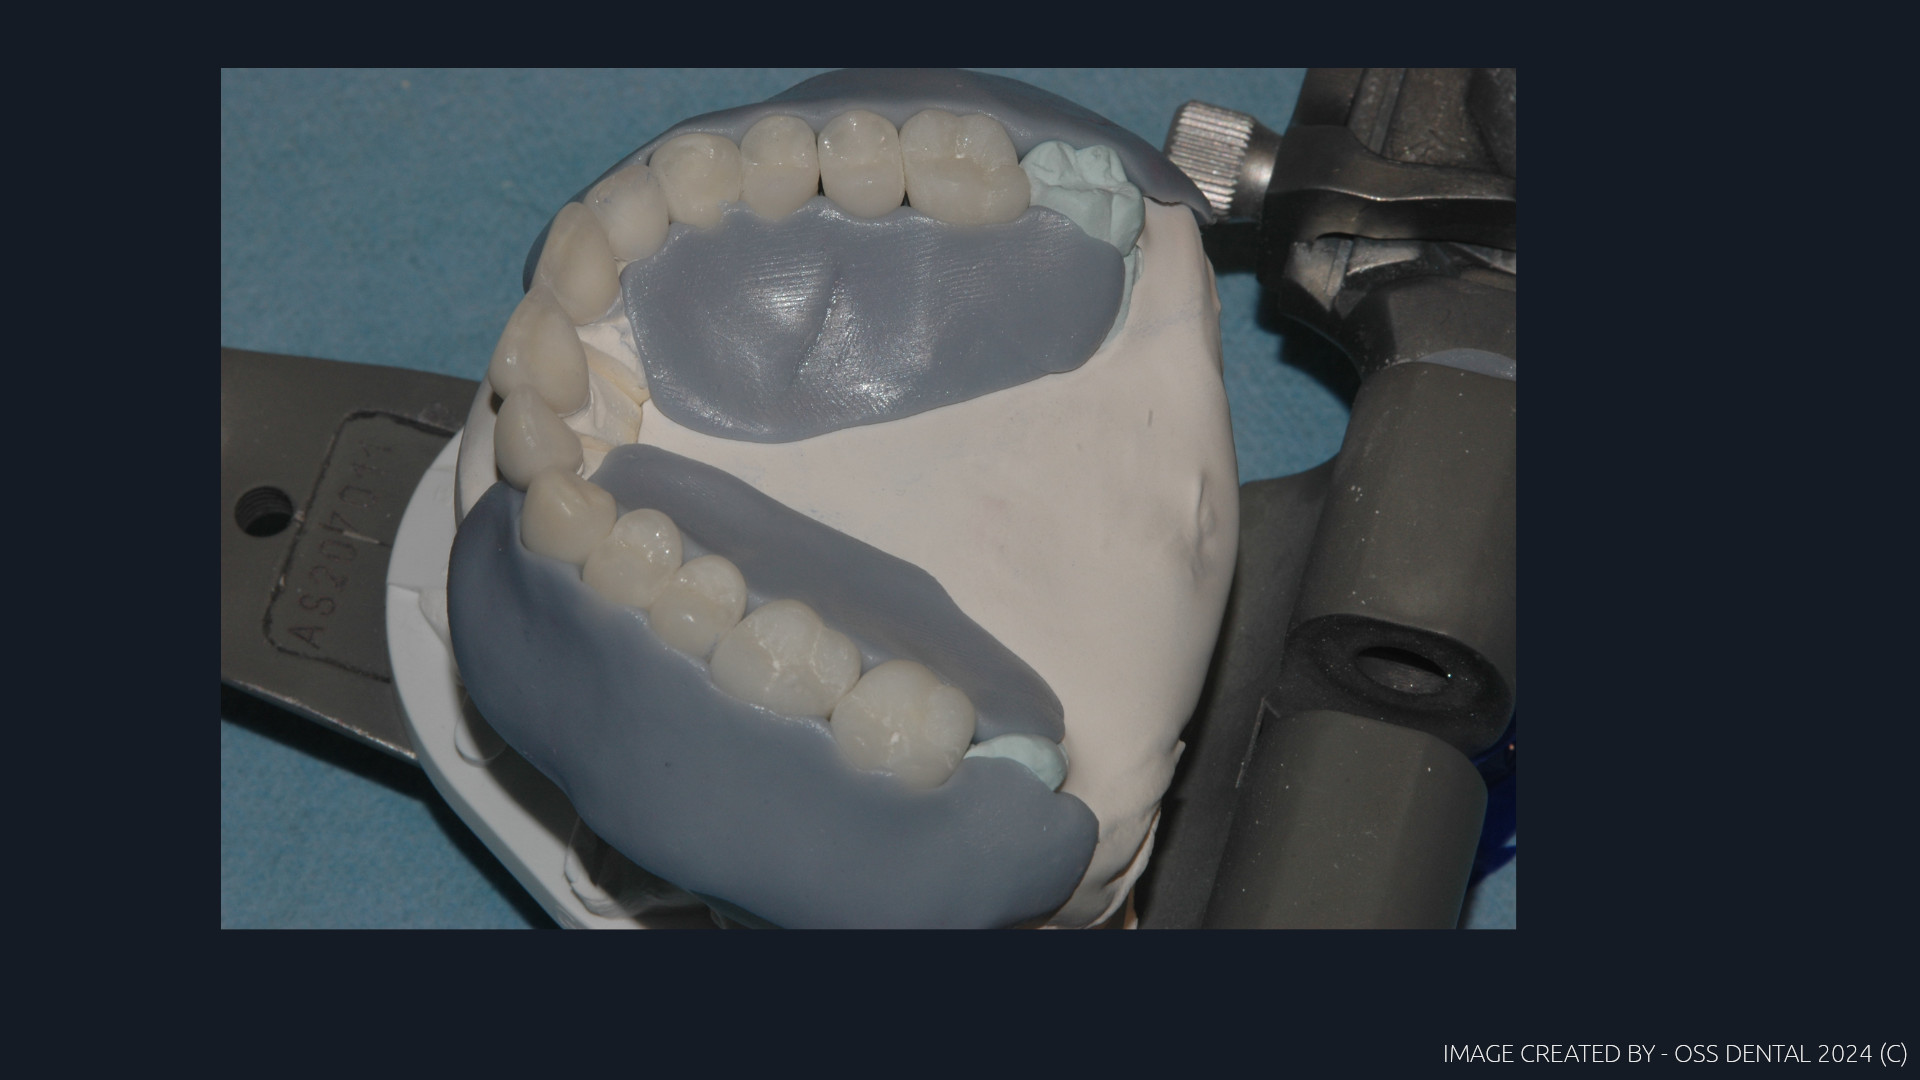
This corrected the arc-of-closure and allowed us to establish a correct guidance that was tuned correctly to that patient by three simple associations. By doing that the mandible then could once again become a Class III lever. The case was mounted by a facebow, with a centric bite and a protrusive bite provided by a dentist. To access the condylar width we use photography to determine the intecondylar distance to set the cuspal positions by tracking the medial movements. No need for anything else, this then was a simple technique to configure the correct case result and the vertical was not changed either. By suggesting mixing Emax for the anteriors and four Zr units to stabilized the posterior segments we agreed this as the best combo for this case as form changes were required and a stable occlusal table needed to be created to complete the treatment.

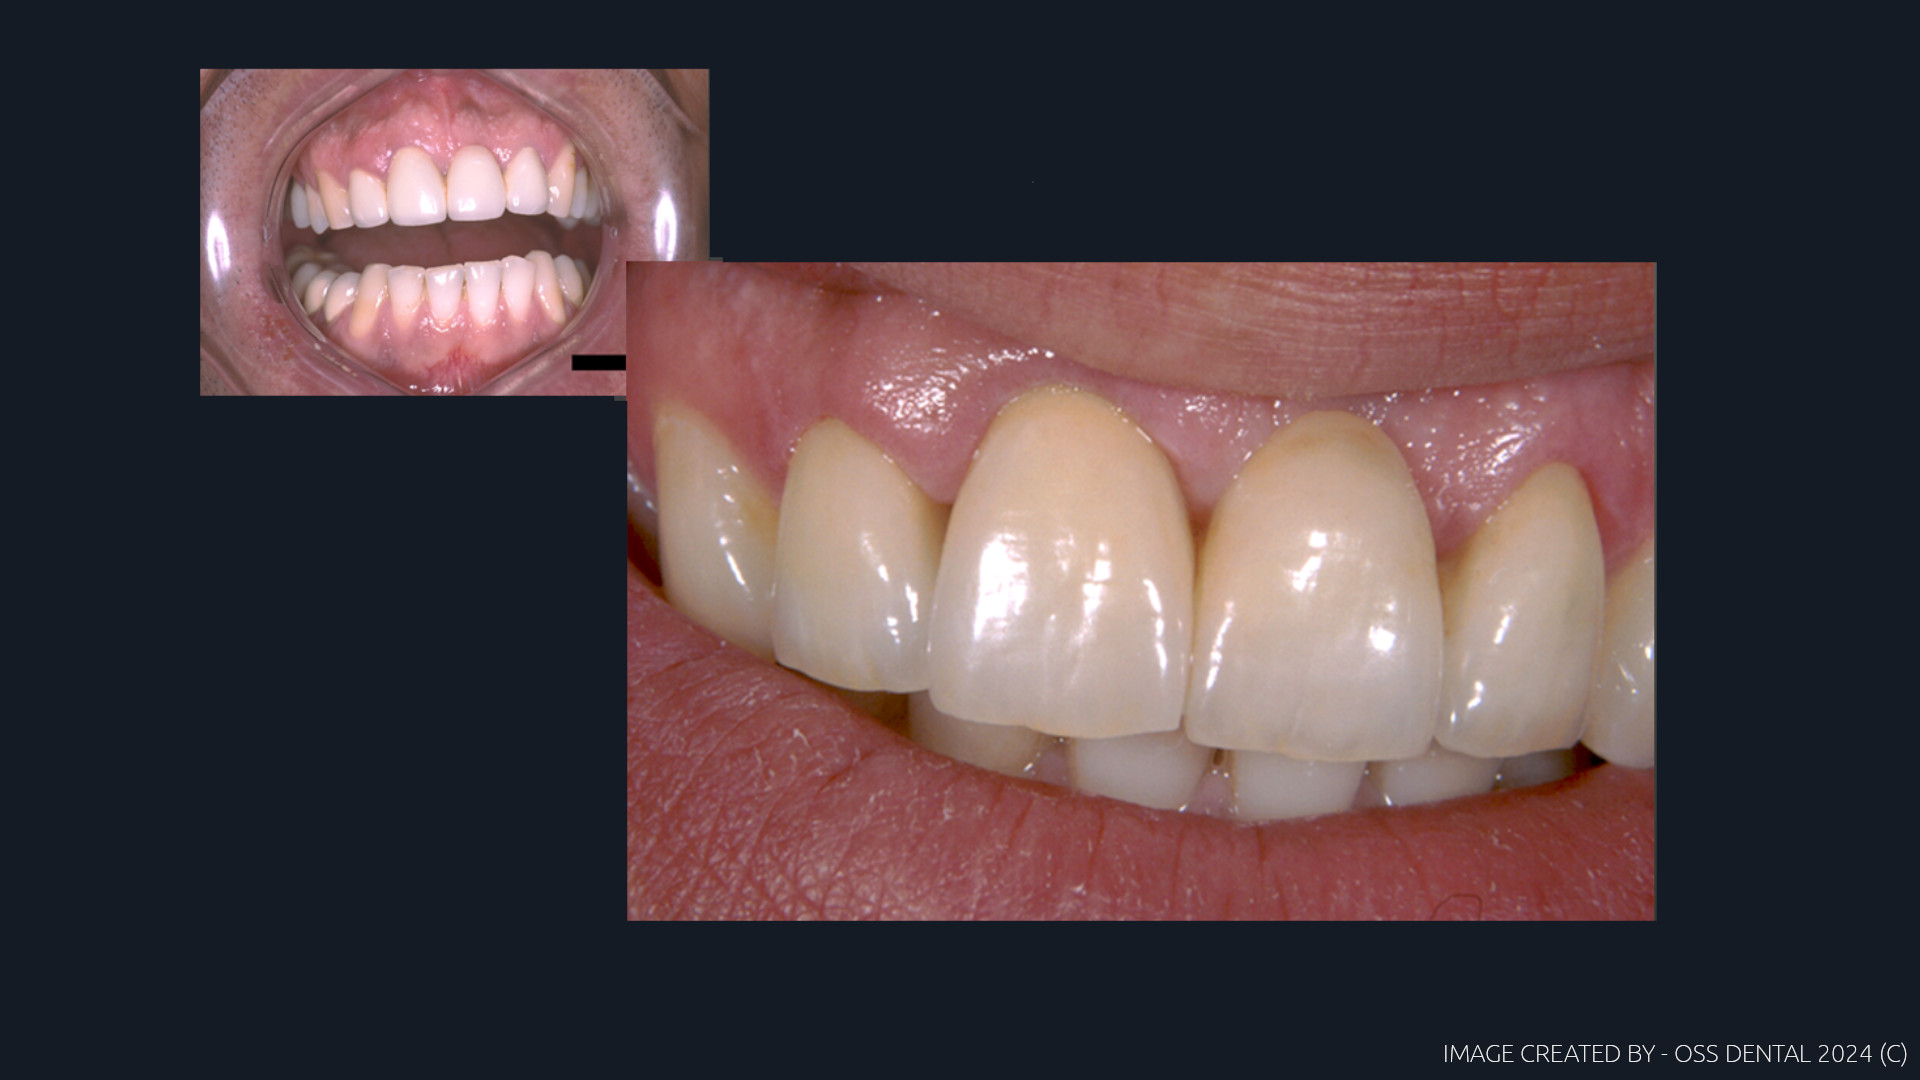
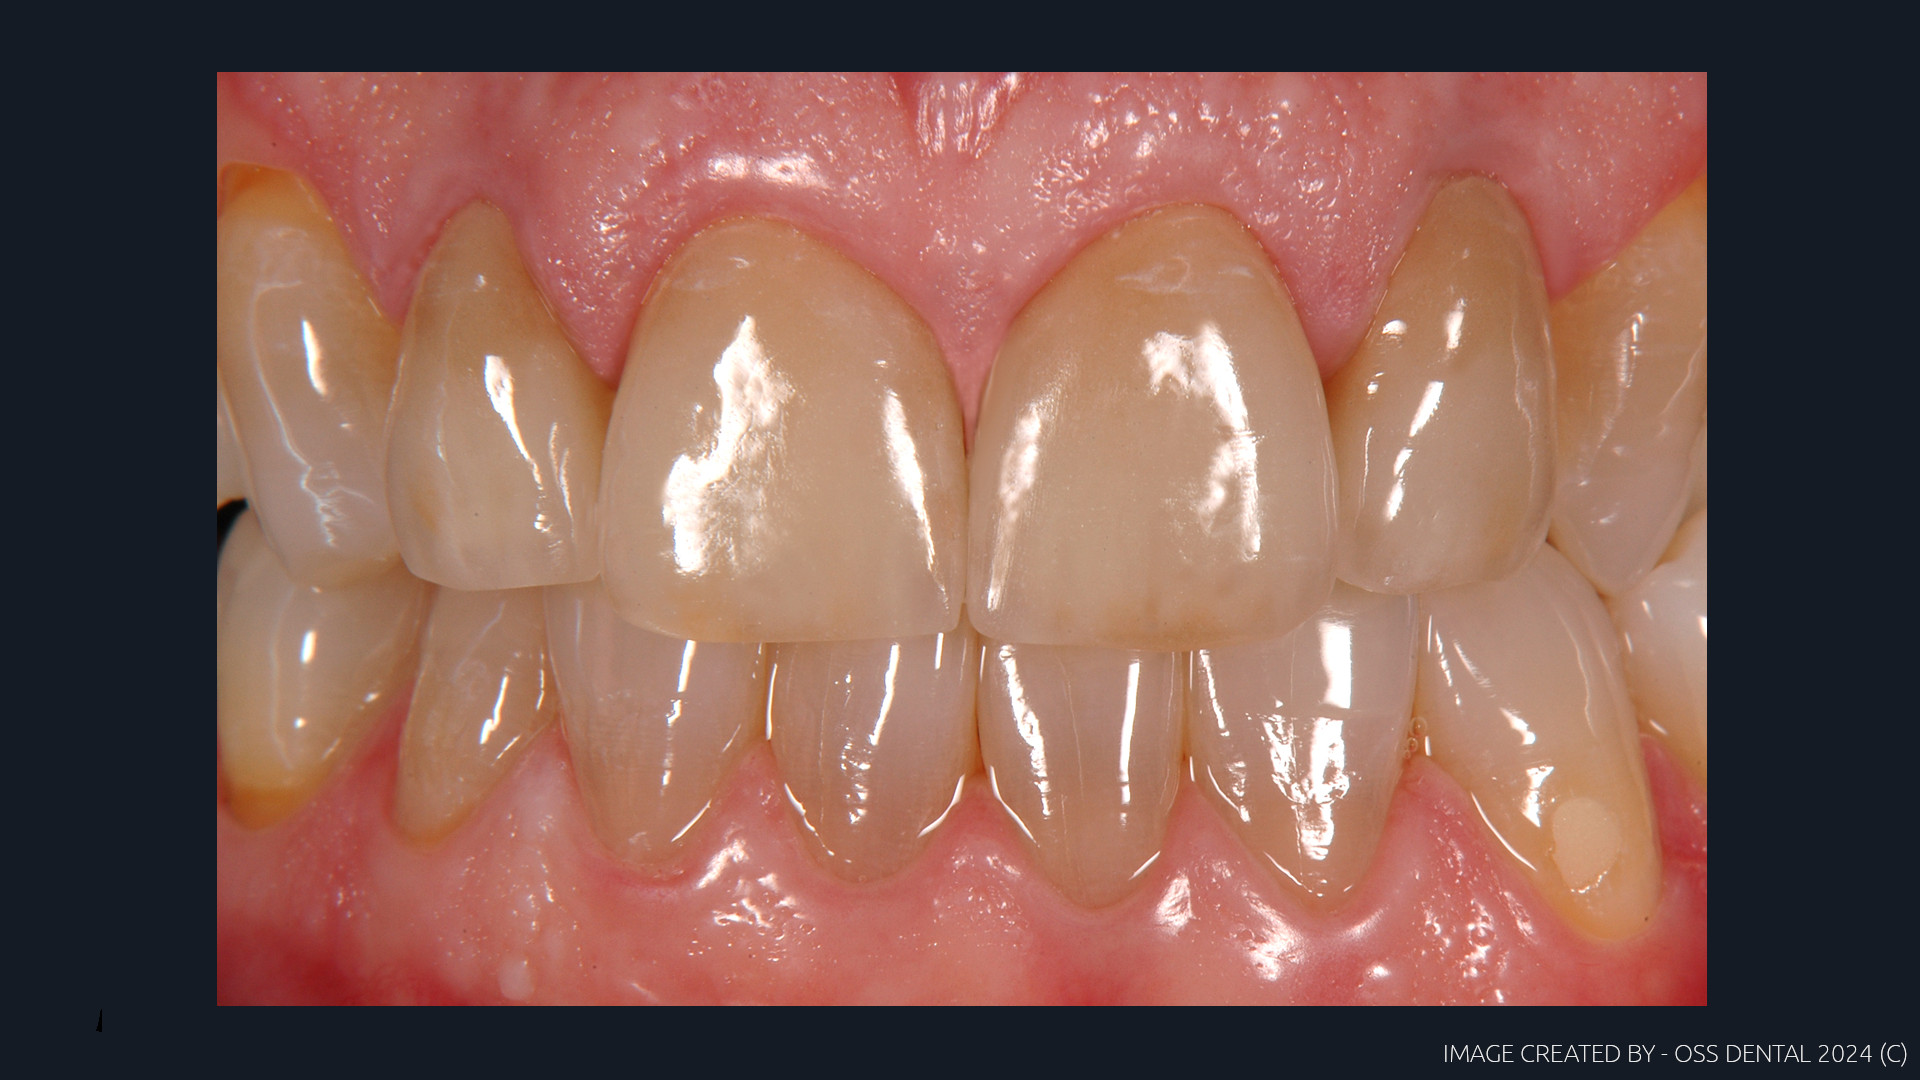
No monolithic units were used, the ceramic was full coverage so shock resilient absorption was correctly spread across the entire arch by using one specific ceramic material which was IPS Emax over lithium and zirconia. The case then made no offensive noise either as Emax is a softer more resilient ceramic, but it needs to be protected and that can be achieved by using posterior Zr to stop compression and the anterior guidance takes care of the medial translated loadings by using the disclusion formula of 2-2-1. Cuspal clearances could now function correctly and the arc of closure was now no longer antagonistic and the attrition stopped and comfort returned. Pre-design and components were made digitally. Temps confirmed the concept and the lower incisors were corrected with composite to complete the guidance. The rest was feel and touch by a team who had experience and knowledge.
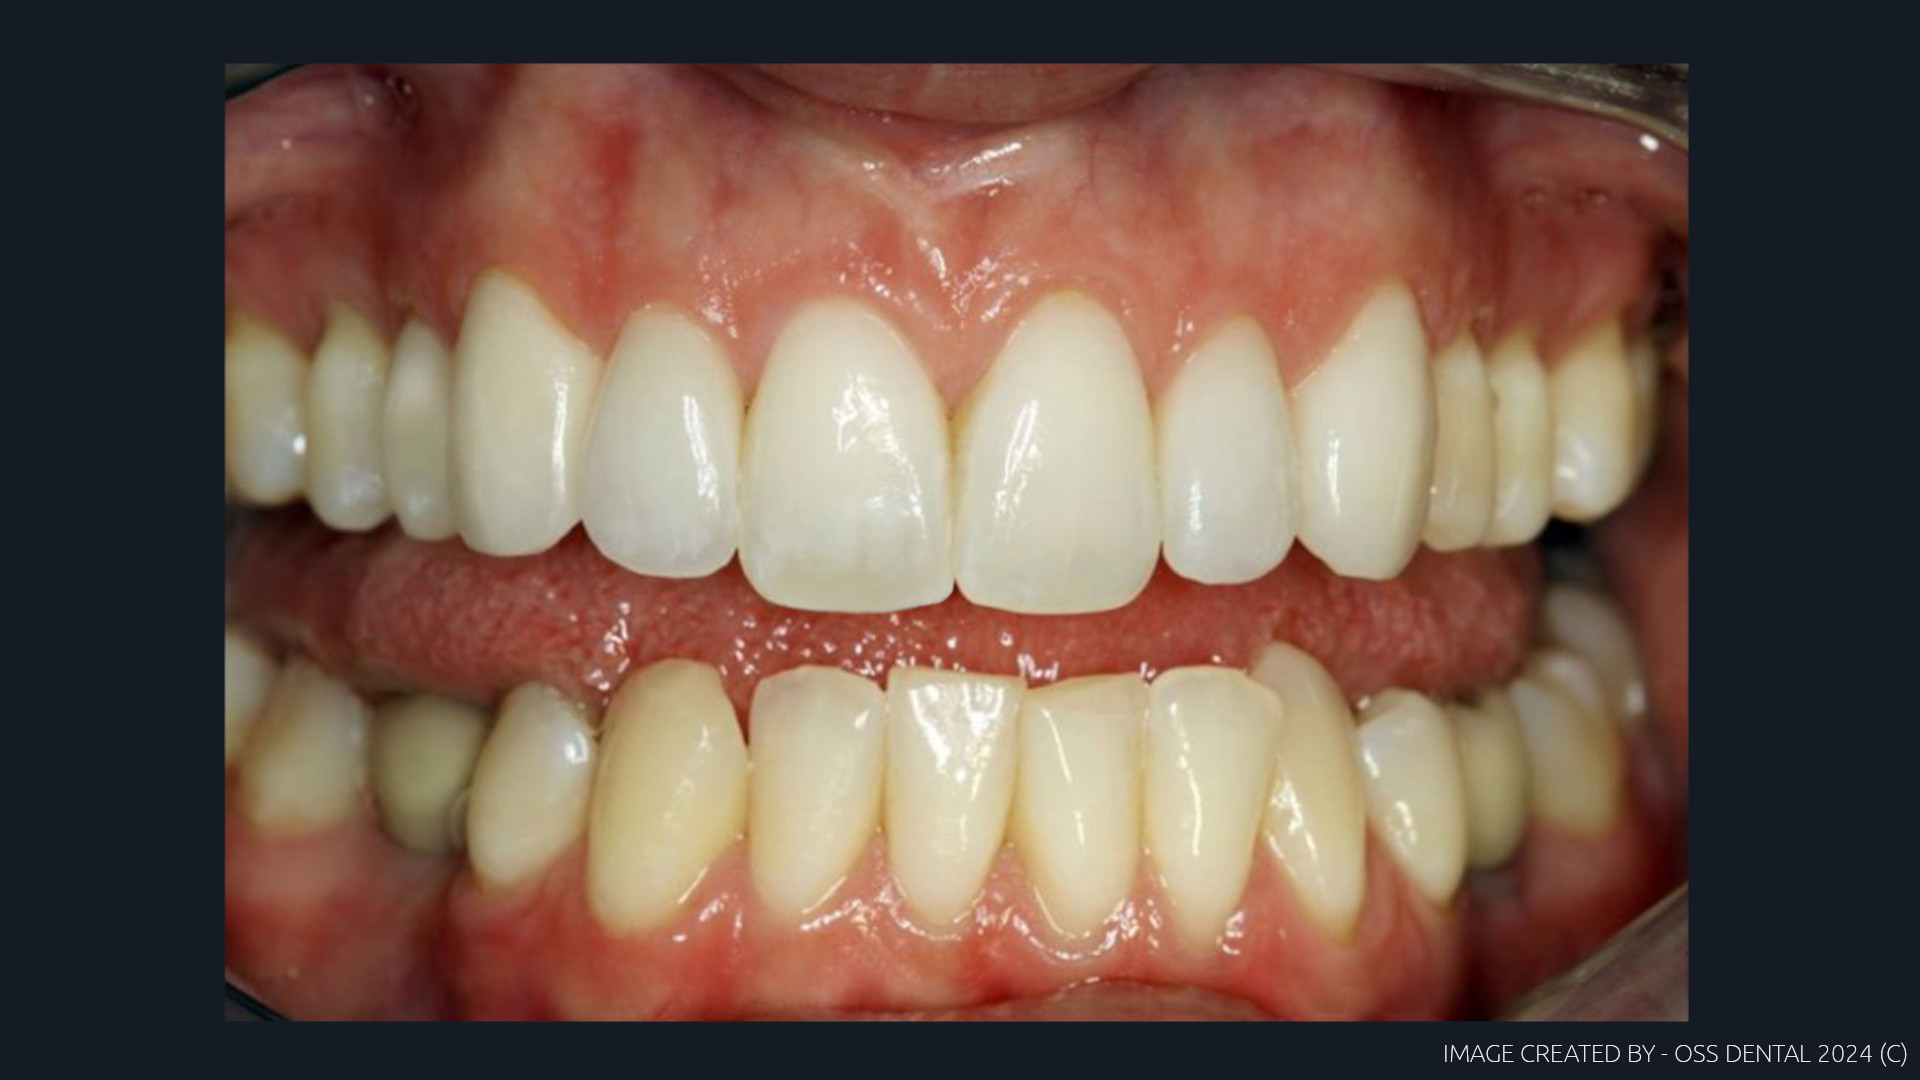
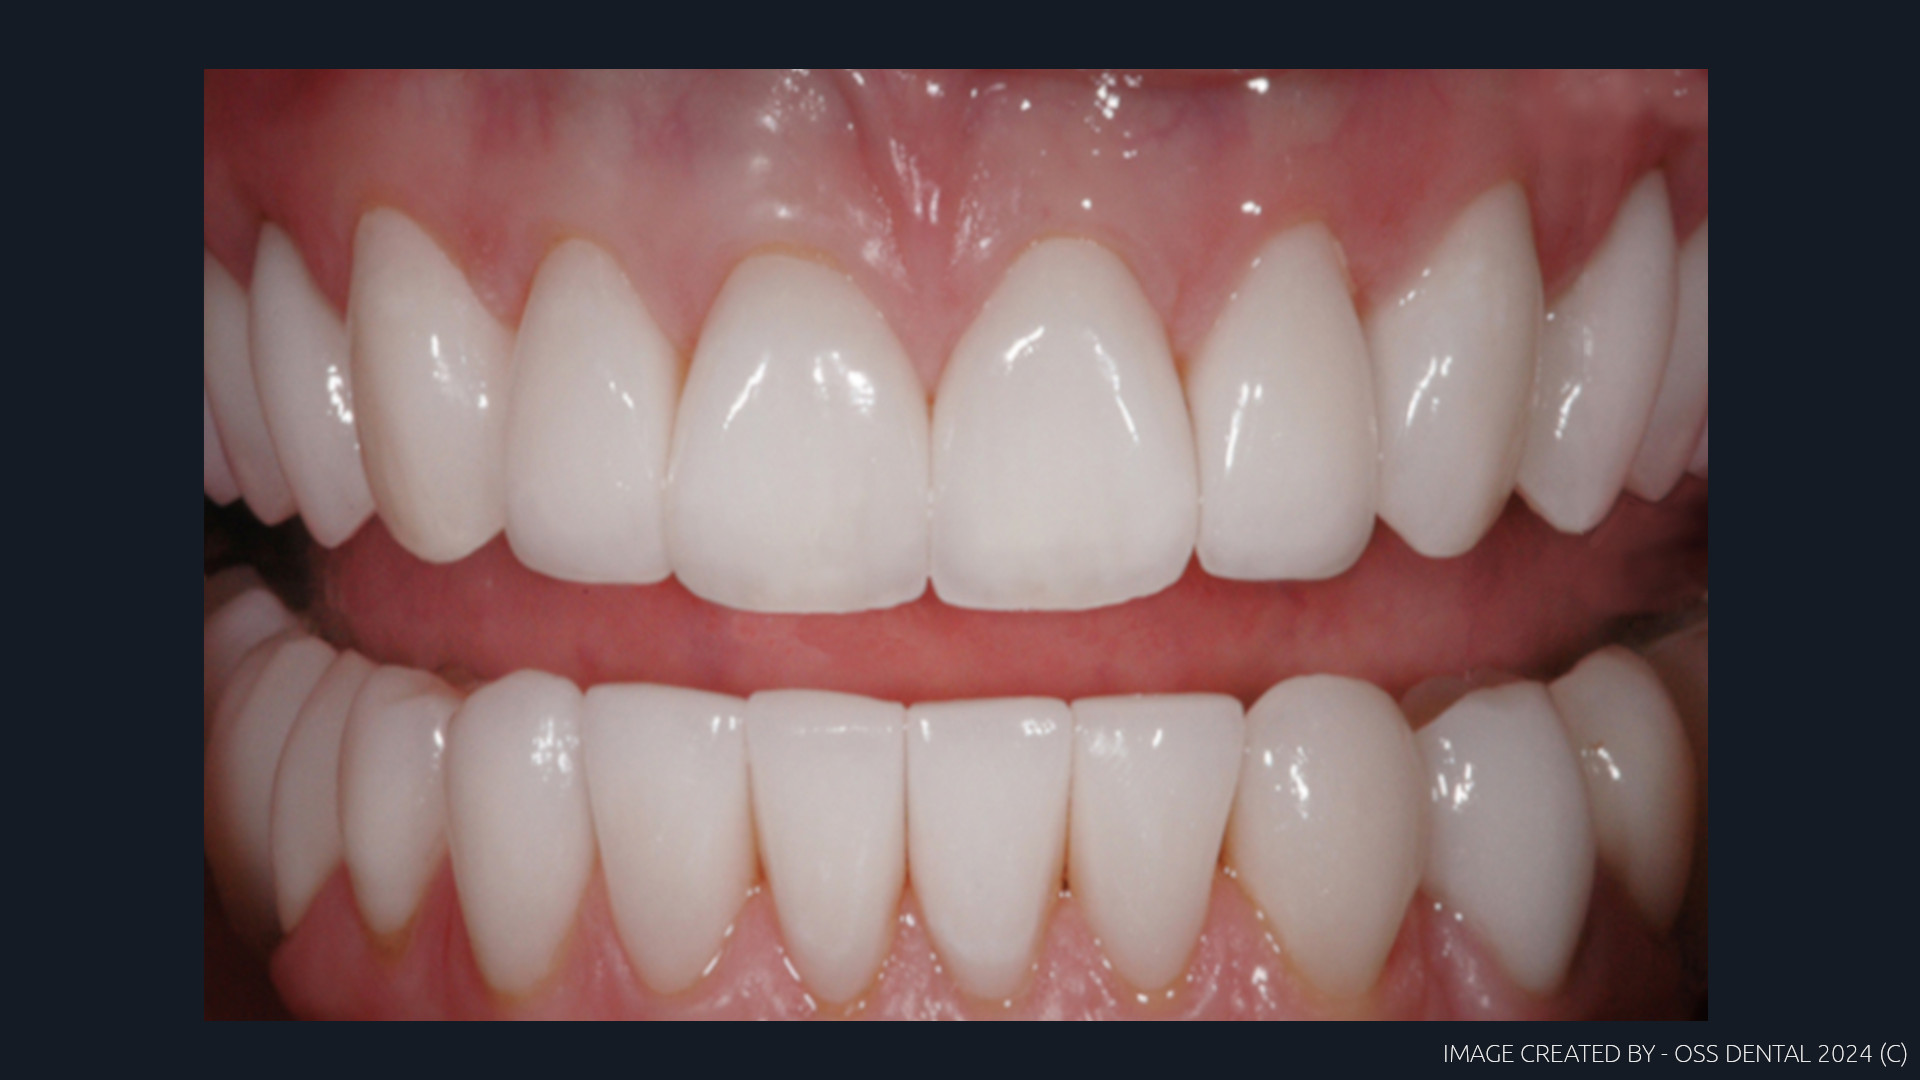


A final look


image


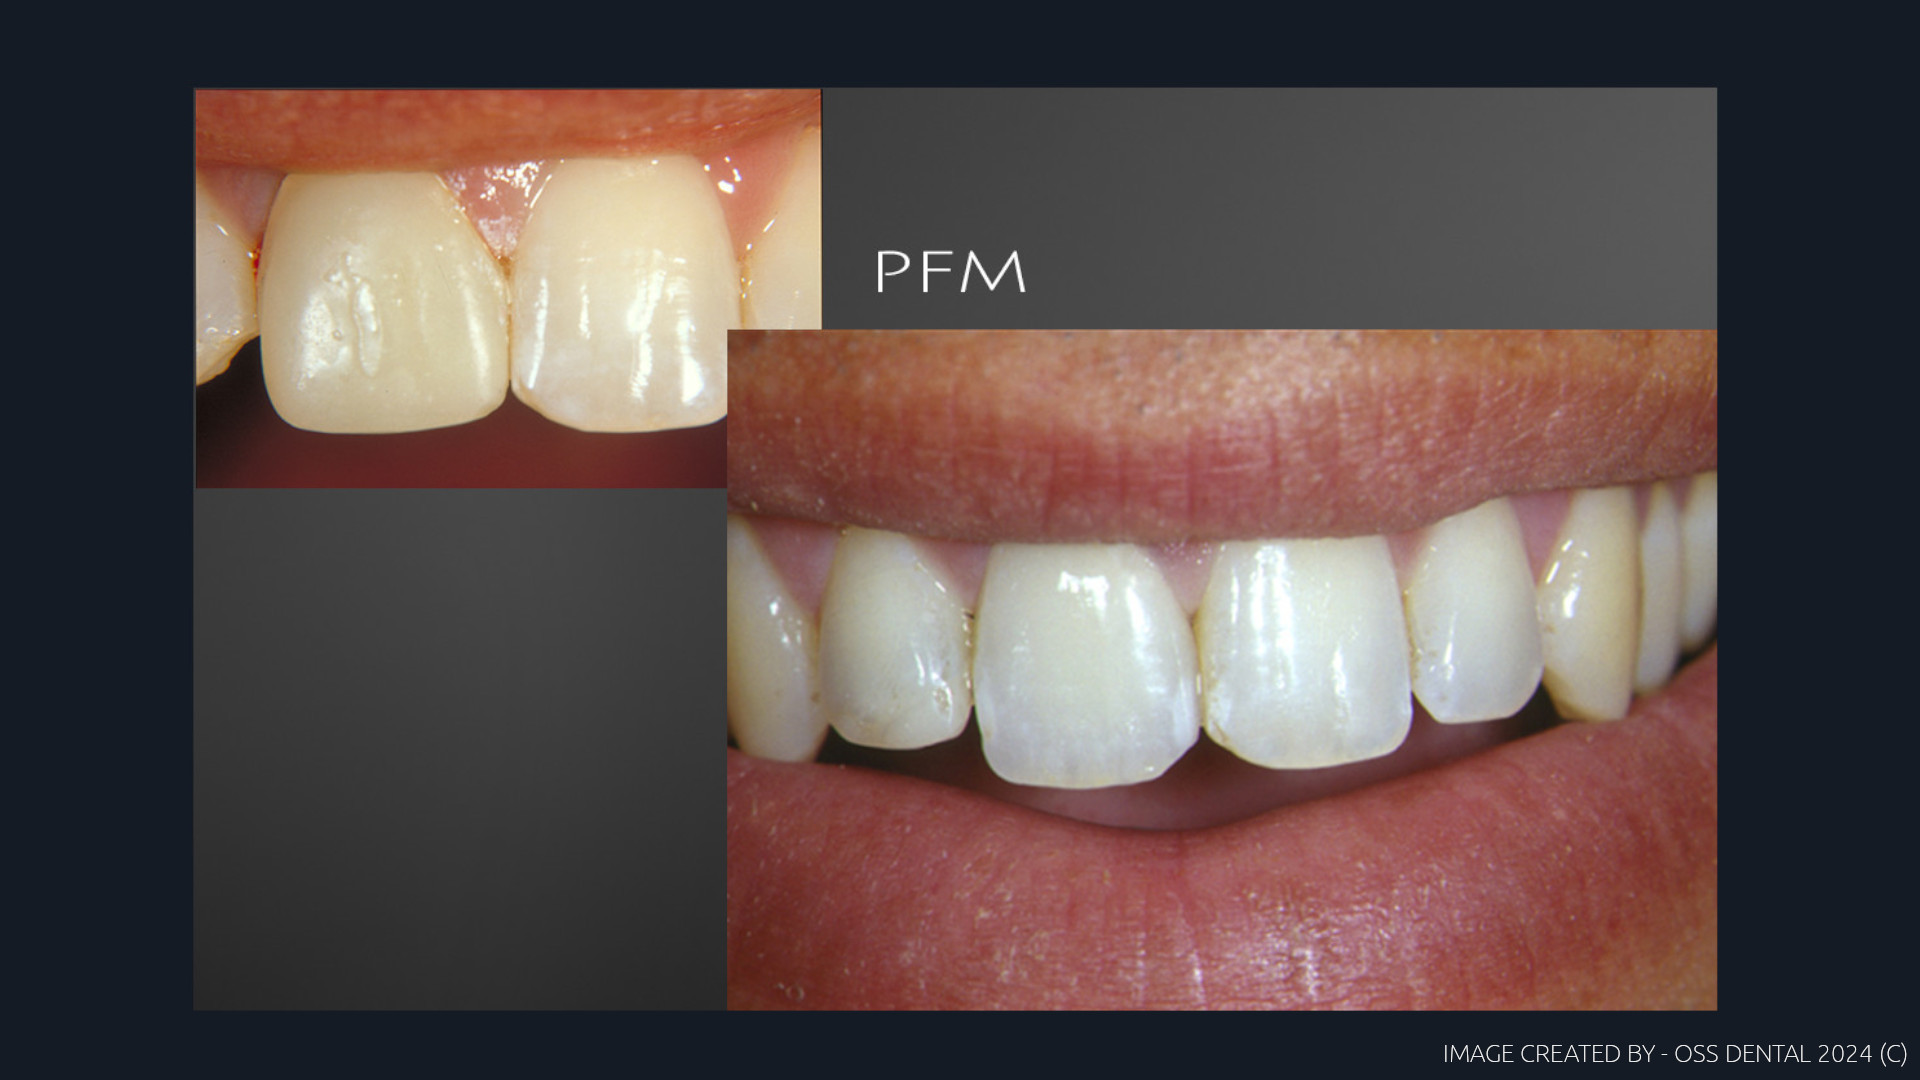
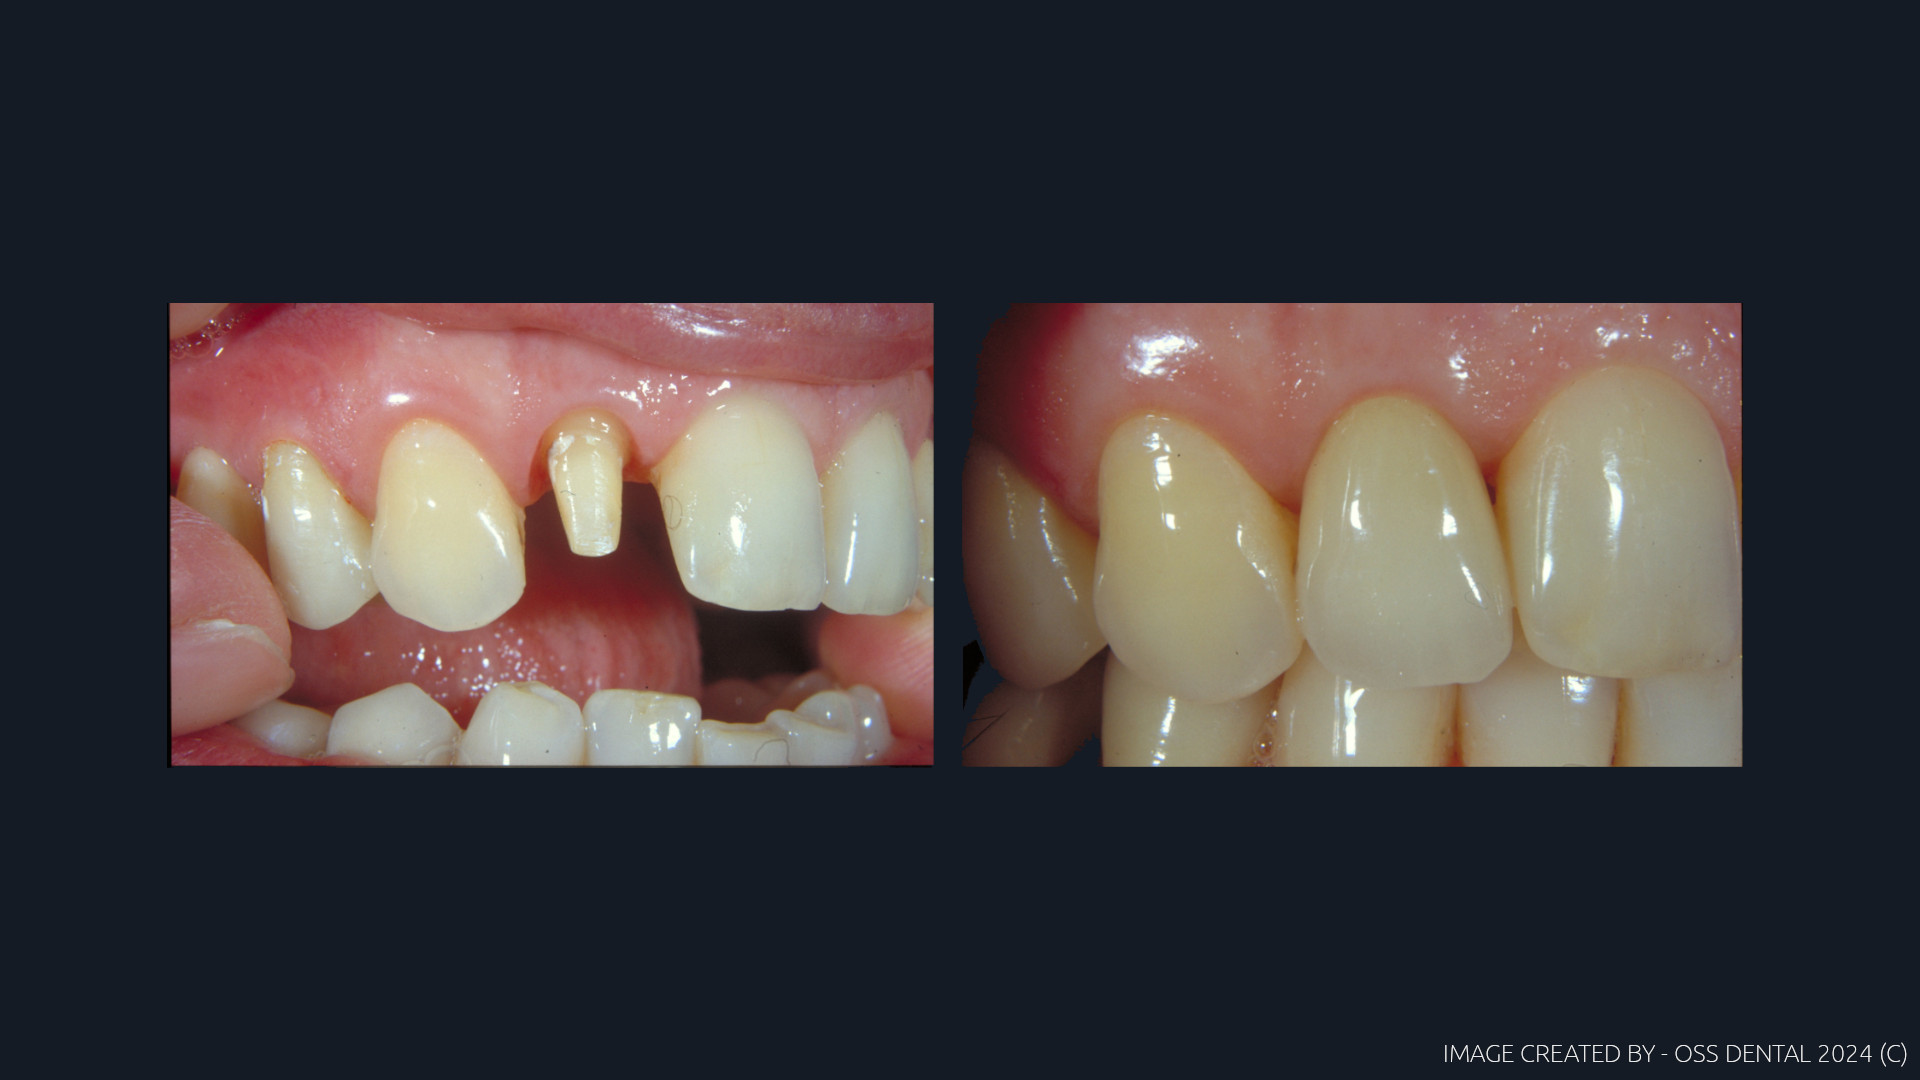
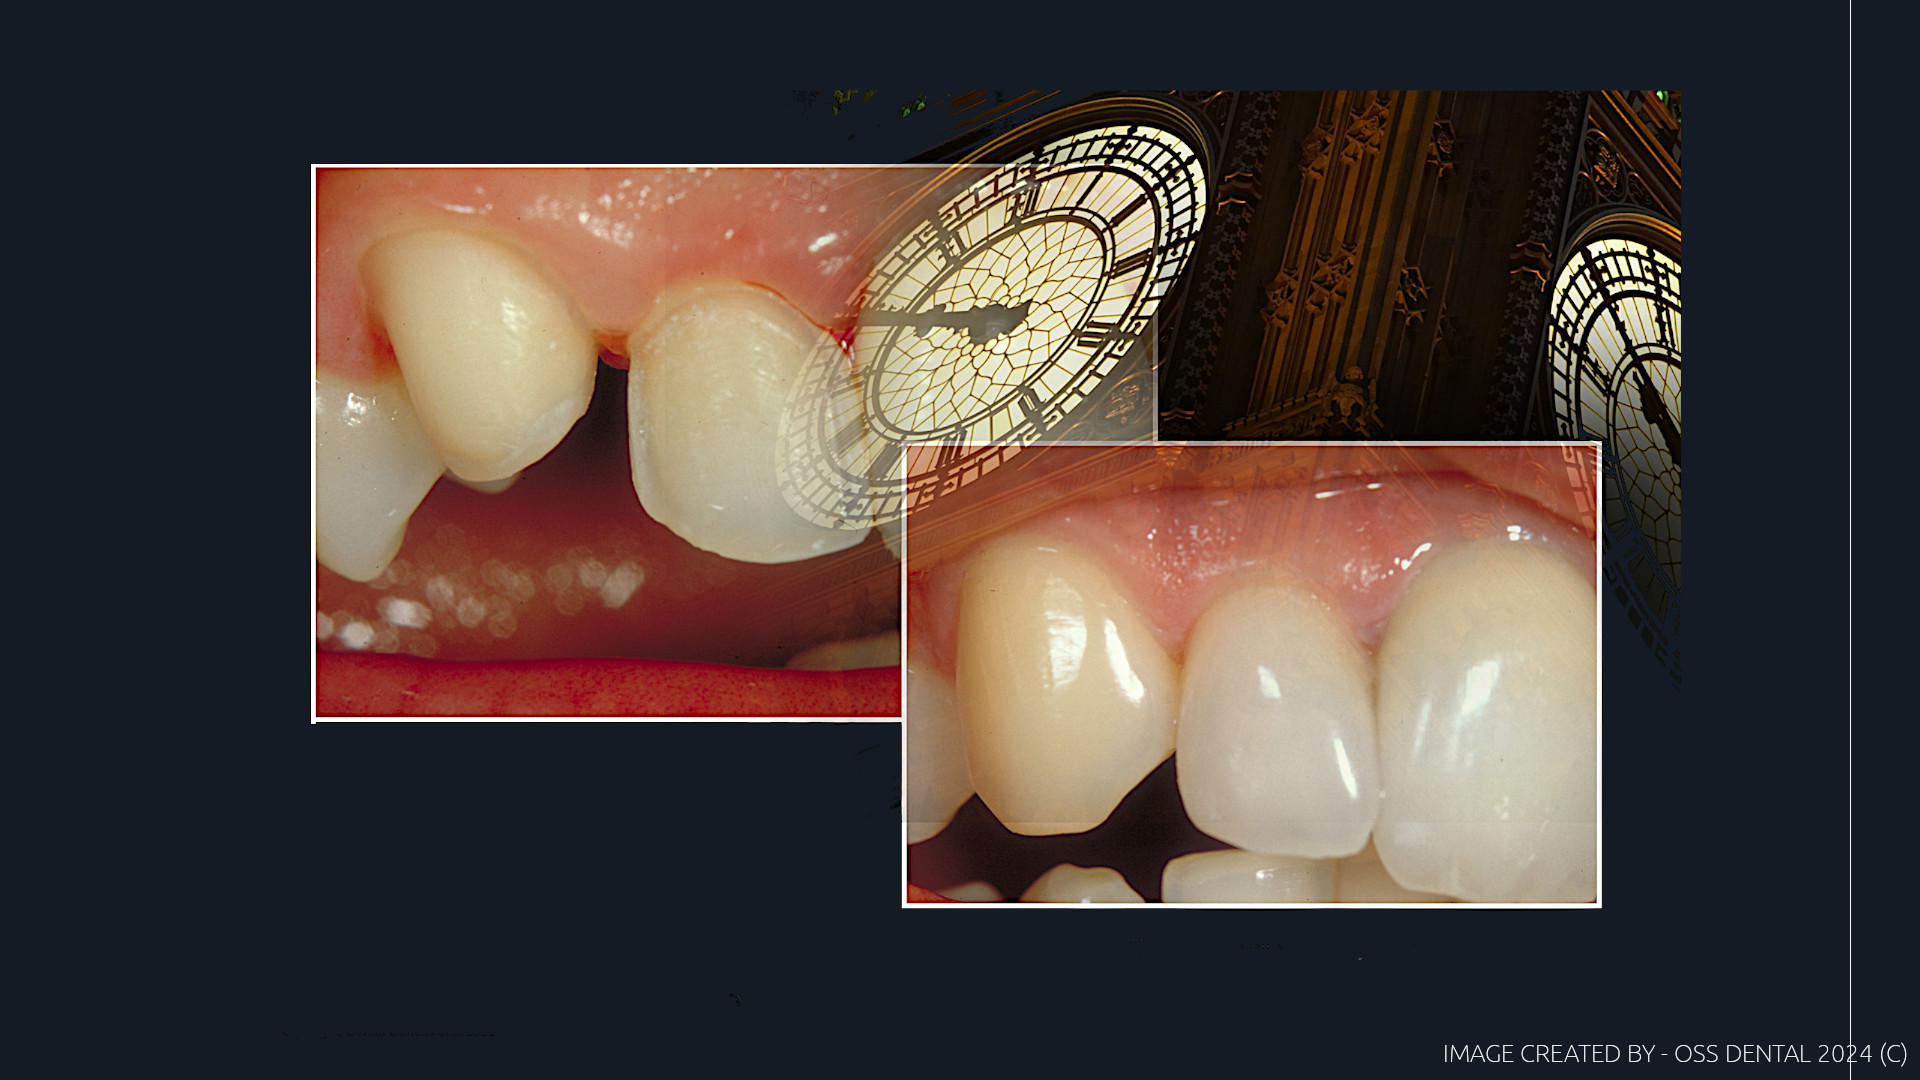
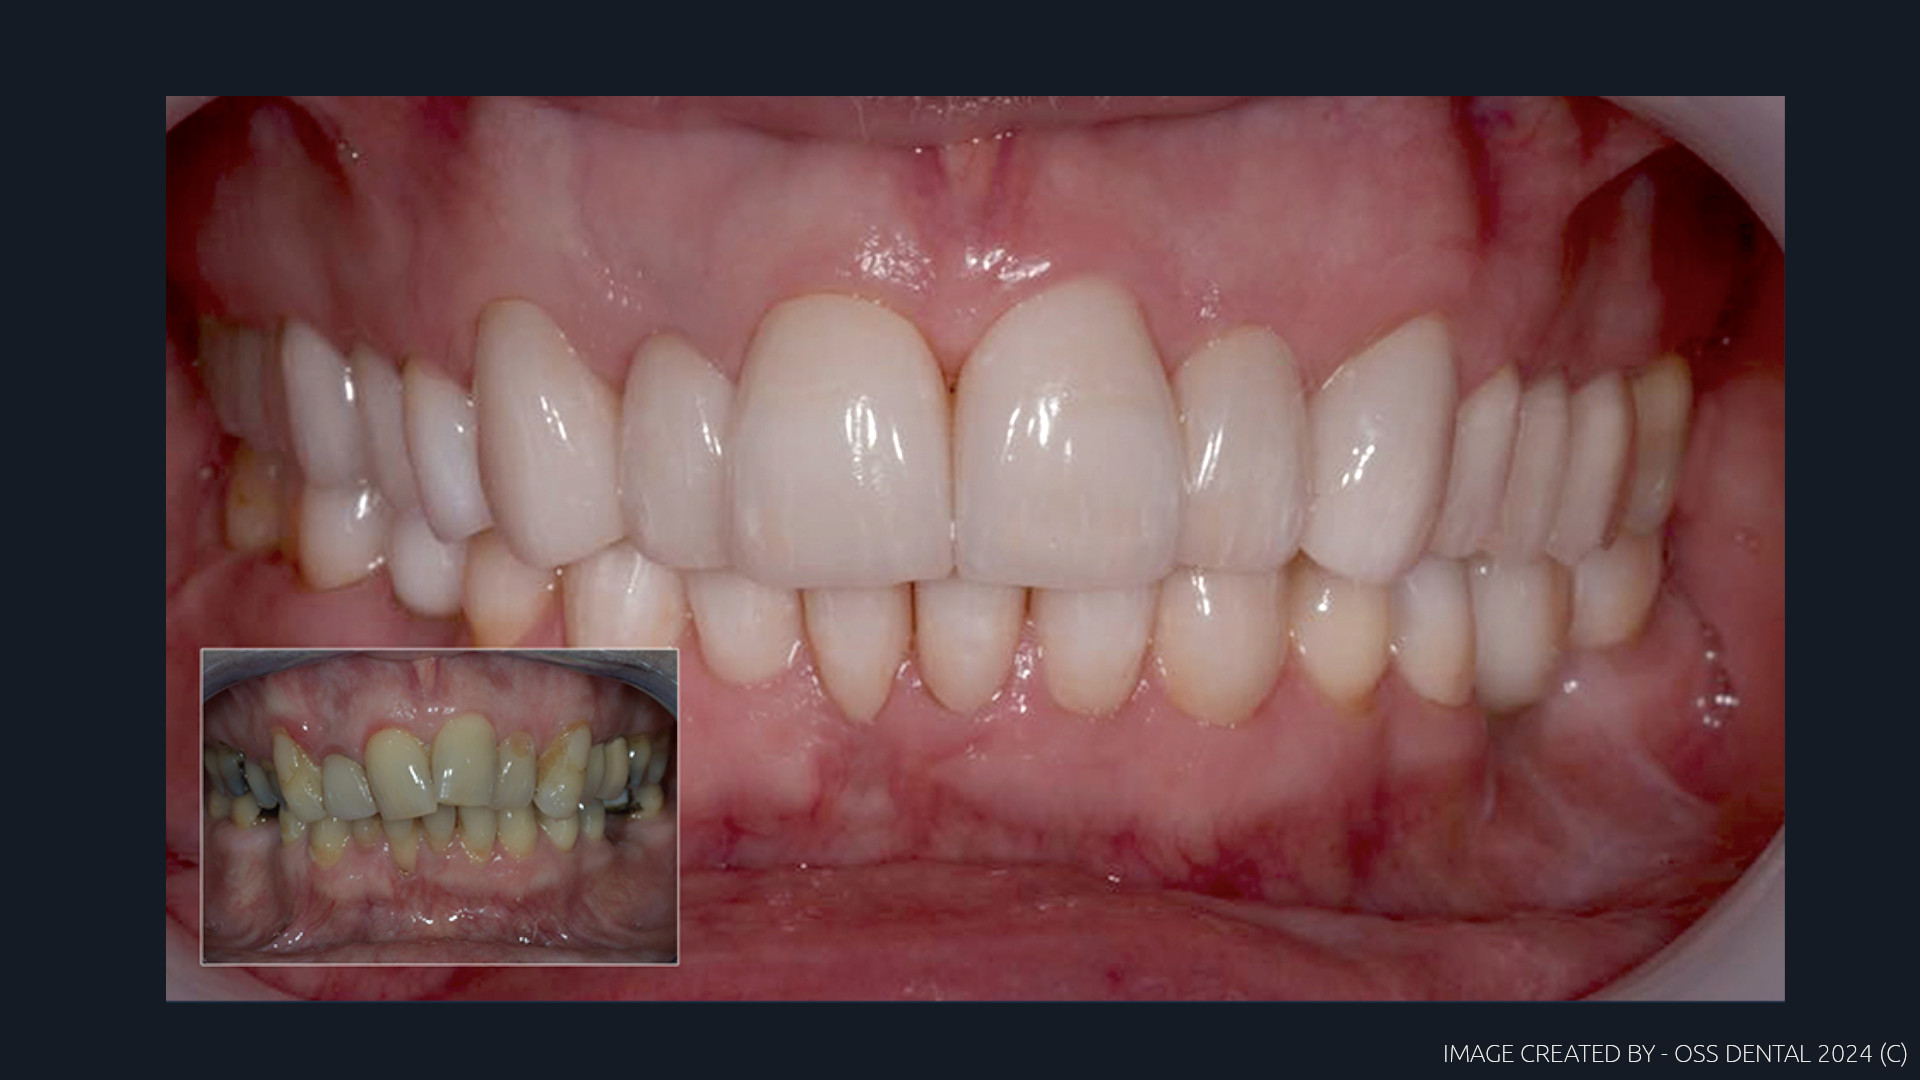
Case No.002; FRACTURED DENTITION - HOW WE MADE IT


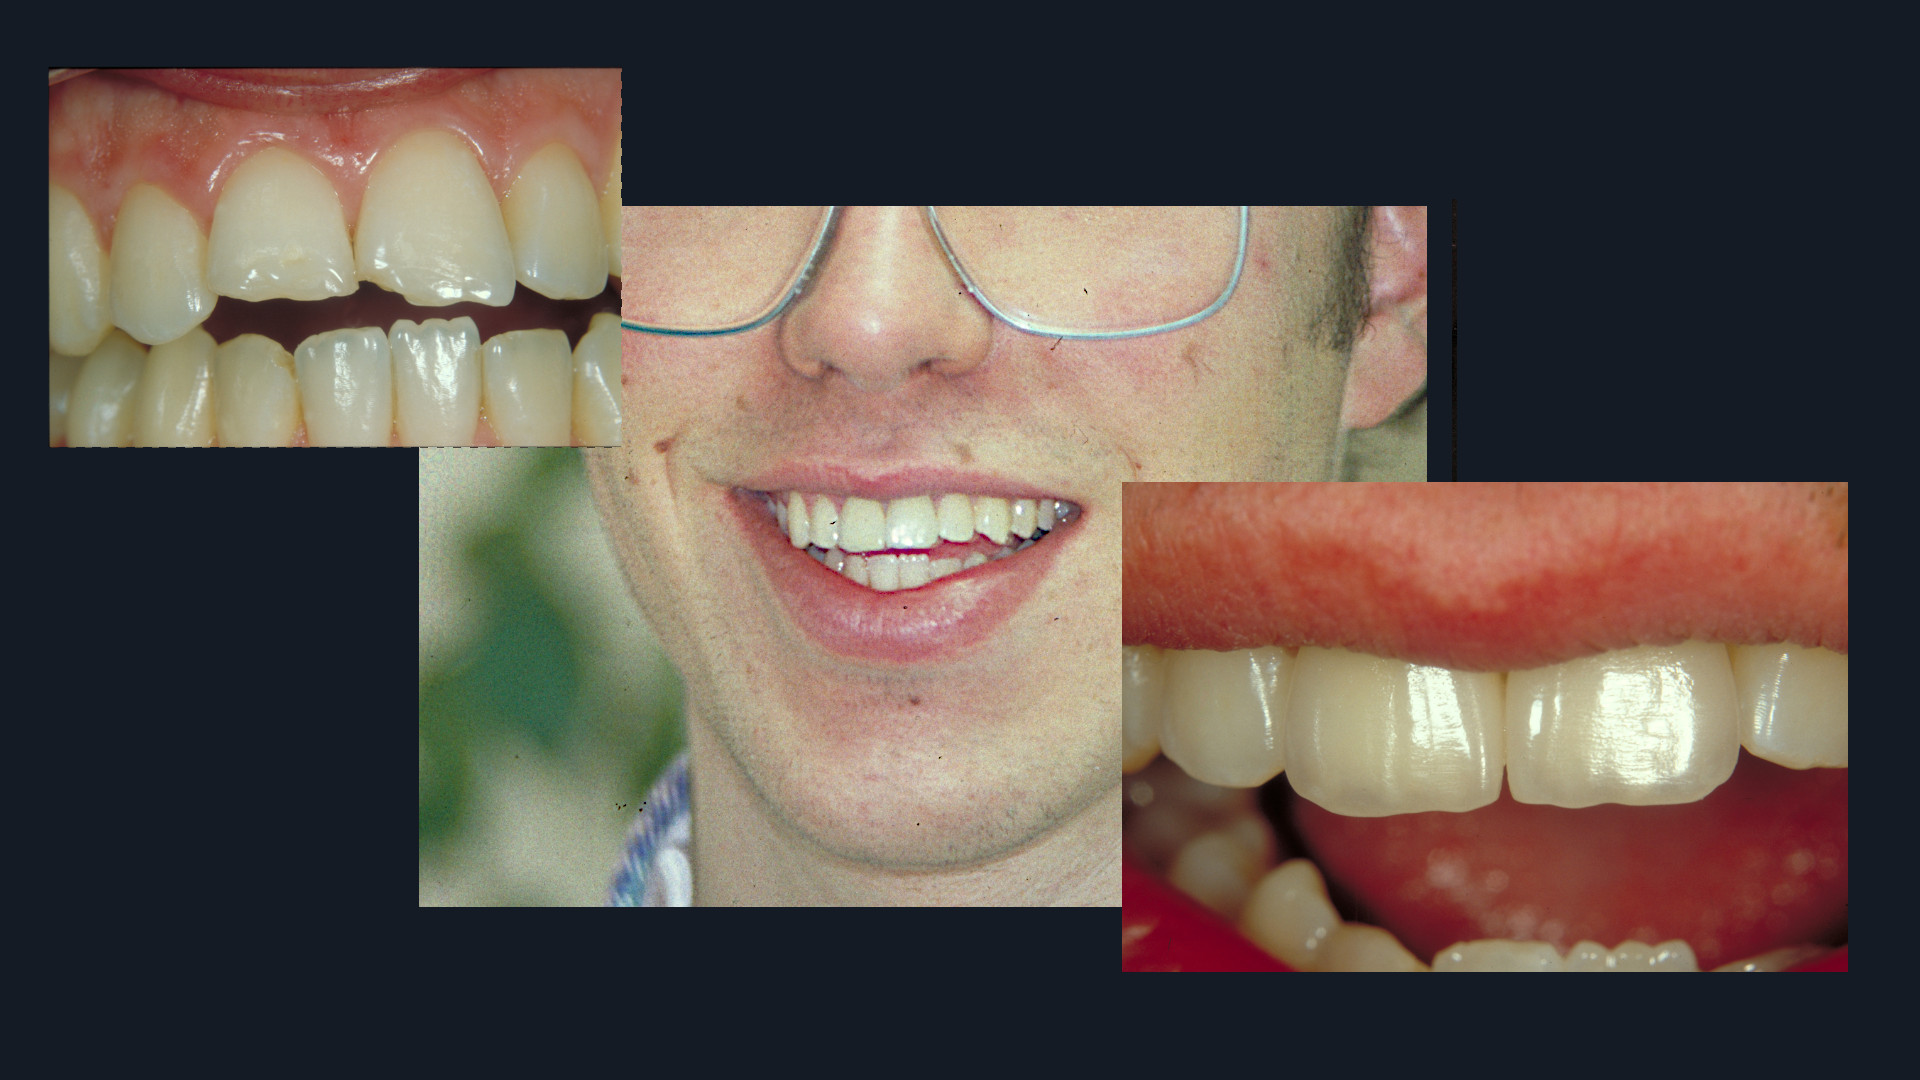
This was a simple case made as two single PFM units. The injury was due to a skate board incident. The reason to use high content gold alloy was the palatal aspect needed to match the concavity of the palatal aspect to maintain the original anterior guidance, the gold acts in the same way as the natural attrition of enamel as it will wear in a similar way. Gold content was 80%. The models were mounted by a facebow to get the correct occlusal inclination. Condyle inclination was not required as the anteriors could be medially tracked using a Stuart articulator. The final and most difficult part to finalize this case was to match the exact texture of the existing anterior surfacing as this patient was young. That was done by hand ceramic scraping and texturing with carborundum paste, not diamond paste.


image


Case No.003; A SINGLE CENTRAL - HOW WE MADE IT


This case was a custom single central made to close a diastema that the patient had. The layering procedure was Color-mapped. The form was to be critical and was carefully contoured to disguise the asymmetry between the two centrals at the midline by creating the correct papilla. This case was made as a PFM because Zirconia was not going to deliver the optical light absorption required as zirconia material is often to reflective in different lighting conditions. PFM is more neutral and better suited in some cases.


image


Case No.002; A PART RECONSTRUCTION - HOW WE MADE IT


This case was a part reconstruction with a correction of the skeletal function and included a form change by combining veneers and full coverage posterior units. Similar to Case-No.1 Eight veneers and two Zr units made up the construction which can be called upon for many cases as a good restorative solution. In this case the facial contouring dictated a form change requirement to smooth out the upper lip curvature when at rest. What works is the posterior restorations then can protect the Emax restorations if the CR is re-aligned as well. If not then Emax will always be prone to chipping and fracturing. For this case we chose a tooth form oval as the original dentition appears to be tapered. This balanced the facial aesthetic to the facial features and would complete the reconstruction by form modification. Quite an interesting case.


A final look


image


Case No.002; NON PREP VENEERS - HOW WE MADE IT


Color-Mapping (C) is a technique you will see expressed often on this website.

Color Mapping in this case allowed me to calculate how much masking opacity was required to eliminate the mamalons without making the units look lifeless. Eighty percent of the cases on this website were created by using my development of a practical shade-taking technique that solved many of the age old issues of taking shades. There is no need now for a dentist to take a shade or a patient to visit our laboratory. It is simply now just a photography technique and the shade is developed as layering maps for a layering procedure through the use of software and an ongoing develop program to solve shade matching issues. The technique which is associated to this laboratory will be published at some time in the future. However, Color mapping does not work with stain and glazing as there is no light transition to allow light to pass through the substructure, which is essential to achieve accuracy. This then is applicable to fully layered ceramic techniques which we favor and have mastered. This case of four non-prep veneers would have been extremely difficult to have achieved this result by normal shade guide techniques as the fluorescent value of the natural dentition was taken into account as well related to latitude.

We only advise how to take the images as Color-mapping is an in-house work in progress technique.


A final look


image


ISSUES RELATED TO PATIENT EXPERIENCES - HOW WE MADE IT


image


Case No.7; Many dentists or Prosthodontists get referrals from other dentists to manage specific types of work or difficult casework, and some are patients seeking better skilled professionals as they are disappointed with their treatment. This case was a typical situation we have seen many times. The patient had a simple request, the patient asked for the incisal length on her two centrals to be replaced which is often lost over time by natural attrition. But she was far from happy with the result. In the end the patient decided to seek another dentist. This was what we did and we spent a lot of time to make sure the patient got exactly what she was seeking. 101 - Communication


image


image


Case No.8; This case was to replace a missing central but it was also a case referred to a periodontist as the upper teeth lacked supporting bone. The complete upper arch are crowns and were assembled in four sections to splint the dentition. The treatment was spread over a few months with long term temps made in HIPC composite to manage the perio issues as it is strong material and can be milled beautifully and polished to retain a high surface finish ideal for perio casework. When the perio was stable we restored the dentition. Many dentists today may prescribe extractions and implants, but this was a simple case to construct. The facial features and tooth form made for an impressive result.


image


Case No.9; A simple crown executed well by the use of RAW photography that was color-mapped down to a basic hue.


image


Case No.10; A custom crown made as a PFM as it suited the layering procedure. With color mapping I was able to break the color down into six maps to complete this result. Single centrals take time and the old techniques was to bring the patient into the laboratory. With color mapping and the correct photography the old days of making these units twice or even three times are long gone. This one would have been a little more tricky in Zirconia. Many cases are still better suited to Metal based restorations, its not dead and buried yet.


image


Case No.11; Another example of mixing PFM and IPS Emax veneers can be tricky owing to different light transmissions. But having done so many it is straight forward. The reason we still ise PFM is because of its refractive index in changing light, room, time, season ,latitude. Skills not to be lost but can be taught.


image


Case No.11; These two central veneers were a science challenge in how to make ceramic defractive due to a strong fluorescent component in the dentine. I made them in London in the Winter. The preps under UV light had a strong fluorescent content which would have been better to have been done in the summer not the winter as UV light is weak at that latitude and more so in the Winter. One can ask depending on ones Latitude is why a dentist would ask for an A3 in the summer and a D3 in the Winter. Very common in the North hemisphere. Daylight is different in the Winter to the Summer and the UV component in sunlight is lower in the Winter. In Las Vegas these teeth would look completely different. Same issue with Emax. The reason for choosing veneers, both were dull in surface reflectivity and one was cracked. The patient liked the longer central which was cracked so both were treated with veneers. The other trick with veneers if there is no form change you can do a minimal prep and leave the interproximal area closed. If a form change is required consider opening the interproximal so the veneers can wrap around the teeth to get symmetry in form development.


image


image


A final look


image


Case No.12; Six High Tech Veneers. For the Interest and for dedicated dental technicians.


This case was an extremely difficult task. The case was six veneers but ony half the tooth length existed. Half was natural tooth and the rest was composite to establish function, guidance and the aesthetics.

The patient presented a variable thickness range from almost zero to 4.5 mm mid section and at the necks back to 0.01 mm. The existing dentition had been built up with composite to establish what would be an acceptable form and vertical.

I faced a difficulty and wanted to blend a transition between incisal and body without a demarcation line across the mid-section as Lithium can play tricks in certain lighting. I made six Emax shells using non fluorescent pellets and thinned them down using a very fine diamond disk so they could carry the ceramic but have literally no influence on the layering. A rotary diamond would have cracked them. Rubber wheels create heat so an old diamond disk was the ticket to use. Two layers laid down some bulk at the middle and then fired four more layers to flare out neck to incisal with some light effects.

Firings were higher than normal so layer connections integrated. I then decided to hand finish them and not glaze them.

Using a silicon putty labially held the veneers in place on the model and then I ground them in with fine diamond paste till the pin touched the incisal table. About an 0.3 mm closure. These veneers worked straight out the box!

"Lapping is a slow and difficult task which I do when finishing reconstructions by using a lock-down technique to get that 8 micron occlusion. Canines removed, pin set at 0.5mm open from the start of the case.


image


A final look; Dentist - Prof. Paul Tipton - Tipton Training - England


image


Case No.13; This case was is a four unit bridge with a central pontic. The original units were old, badly made and stone white in appearance. We were asked to make something undetectable.


image


Case No.14; This case was four veneers and was similar to the case above but less complicated. Again these veneers were calculated by Color-mapping. The lower image is simply a reference of the original dentition.


image


Case No.15; There are no before reference pictures for this case as we took it over at the prep stage. The case is a complete Zirconia reconstruction of the upper and lower dentition and was made in shade A1, so no color-mapping was required. It was not complicated to make as we followed a base protocol which was guided by the five principles of occlusion which is about mutual protection of the anterior segments protecting the posterior quadrants and visa-versa. The vertical was established by the initial treatment crowns, (Temps) and the patient was de-programmed from the start. This case was constructed on our Stuart articulator and the feel was established by a lock-down technique and finally ground in to the pin reading by motion grinding with diamond paste. After the intercuspal setting was finalized the units were cleaned and a gloss polish was achieved by using metal polish as this does not remove any further ceramic.

This stage is actually quite time consuming and depends on how accurate one wants to go. Most of the calculation is completed by digital design and finalized on an articulator by what we term as feeling. Something computers cannot understand. Then a procedure can be developed by copy scanning to complete the case. As we work between centric and long centric we follow a standard procedure that begins with digital assist which reduces our work time by many hours. This is precision dental reconstruction work and when patients leave the chair we often if not always hear "wow".


Primary assembly


image


CASE N0.16 - VERTI-PREPS - TECHNIQUE OVERVIEW


Verti-Preps is a technique not many will have heard of and it is not difficult in the hands of an experienced clinician. But one needs to understand the technical aspects which is critical. This is very different to classic restorative techniques as there are important aspects to know and understand.

It is mainly completed by the dental laboratory and focuses on how the temporaries are made which is the secret to success. However because of the knife ege crown requirement it is only suited to zirconia as it has excellent chip resistance at the circumference of the units.

The dentition is prepped but there are no margins prepared or is there any packing required. Tooth substance is removed and at the same time the tissue is cut as well. When completed impressions are taken and sent to the laboratory. The technician then prepares the dies by removing all the tissue. The outline of the temps is marked by a pencil or red crayon on the dies to create a corrective and aesthetic appearance. See the image, before and after. The next stage is to scan in the dies or waxup the temporaries. Which ever way you wish to proceed you need accuracy. We now go digital as we no longer hand wax because digital is quicker, its adjustable and repeatable.

The temporaries are then made to a very precise tolerance at the chosen periphery and the margins must be extremely well finished and almost internally vertical around one to two degree taper. We use HIPC composite pucks and mill out the units with high density composite. PMMA is too soft and lacks surface finish. Temps are then fitted and the tissue heals to the temporaries that have a specific shape to allow the tissue to contour correctly. Planning and speed is needed to get through the fist stage. Once the temps are fitted the healing begins and the final units are also begun and completed. No other impressions are taken.

Thats the basic technique, the rest needs to be understood from the technical aspect and I can support this technically if there is interest in this technique, call the lab as we are well up on VERTI-PREPS.


image


image


image


image


image


Contact: +1 702 487 0099

contact@ossdental.com

All image uploads: https://wetransfer.com


Location:

5730 Skye Pointe Drive

Unit #101

Las Vegas

89130 - NEVADA

USA


Web-Ver. 001 | 24-03-2025


Website updates are only posted on the index (home-page)


image


© Copyright OSS DENTAL - All Rights Reserved - 2024

© Copyright Website construction and photography - OSS-DENTAL - 2024 All Rights Reserved